By Pete James
All watercolour artists accumulate painting gear.
I guess we are all looking for that device or product that will give us the "magic edge". However, I have observed that the better the artist, the less equipment they carry. So, is much of what we accumulate unnecessary?
I am no exception: I could open a sizeable shop with my now unused equipment purchases!
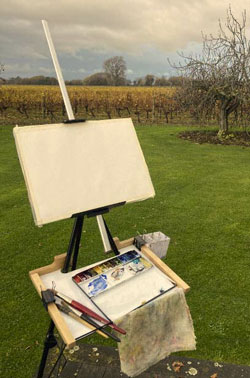
However, some equipment is vital and effective. One item that has made a dramatic improvement in my outdoor painting life is this clip-on tray that will fit almost any lightweight easel. It holds palette, brushes and water in a convenient place. Although the original design is not mine, I have developed a couple of modifications. Many painters have asked where I got my tray from. I made it for myself and have made several for artist friends. They are either unusually polite, which I doubt, or have found it as useful as I have, as they are all effusive in their praise. The newsletter editor, the politest of those friends, asked me to contribute an article.
Materials List
-
Base: Light plywood about 4-5mm thick, dimensions 400 mm x 300 mm (I used a piece of sign-writers board which is plastic).
-
Risers at the back: 15mm thick plywood, 400 mm long x 40 mm wide. This will be cut into two pieces 137.5 mm long.
-
The rails on the sides: timber batten 15 mm x 15 mm x 650 mm long. Again, this will be cut into two short pieces.
-
About 8 small screws and some epoxy glue (Araldite or similar).
-
Some lightweight bungee cord and clips.
You should be able to get all these materials at your local hardware store.
Cutting and assembly (Photos 2,3 and 4)
The dimensions given for the base are my recipe and that size fits most easels. I suggest you start by making a template of stiff cardboard to ascertain the size to fit your easel. You may need to modify the size of the holes for the easel legs (shown as 25mm diameter) and the height of the riser at the back (I use 40mm). Do not worry about getting the tray to sit level on the easel, in fact a small tilt towards the operator helps with water drain.
Basic woodworking tools are required to drill and cut out the base panel. If you do not have these, you will probably know someone who has or a local joinery workshop would take 5 minutes and a plate of scones to do it for you.
Glue the risers along the back of the base. I find it easier to glue and screw the full 400mm piece of riser along the back of the previously cut-out base, and then cut the 125mm gap afterwards. I cut my risers with a fancy shoulder for looks and weight reduction but that is not strictly necessary.
Cut the rails to length, allowing a small overhang at the front of the tray to accommodate the bungee cord. Glue the side rails to the base.
Drill small holes at the front of the rails and thread the bungee through as shown. The ends of the bungee can be either looped and knotted or finished with a clip at either end.
Using the Tray

Put up your easel and fit the tray over the two front legs, so the legs sit through the cut-out. Slide the tray down to a snug fit, with the risers resting against the backs of the legs. Secure the ends of the bungee cords to the lower front easel legs.
The bungee cord will stiffen the assembly and secure it in a breeze. The bungee across the front of the tray will hold brushes, sponge etc in place. I secure my (square-sided) water container to the outside of the tray with a bulldog clip. Bulldog clips may also be used on the side rails for other items.
Extras
You can increase the dimensions of the tray however remember you will have to carry it! I find the size shown is big enough without being cumbersome.
You can, of course, cut a hole in the tray for a water container.
You can finish off the woodwork with sandpaper and a light coat of varnish, if you wish.
And now of course you will have fewer hassles and be able to focus on the one thing that will give you that real "magic edge".... painting, painting, painting, and then painting some more! There is no product or device that is a substitute for practice!
But wait! Just saw this amazing brush online! ......
Read more:
"An easel for outdoor painting" by Sue Wild


